
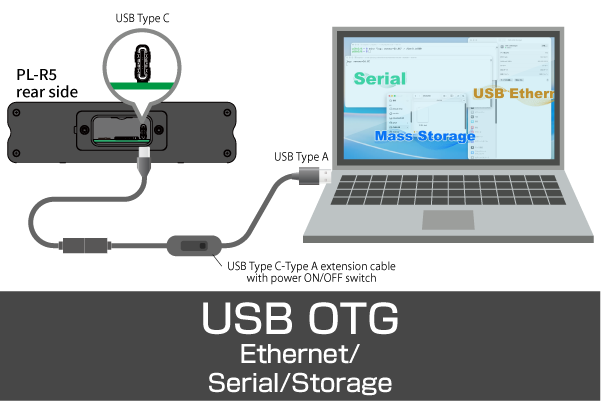
Some industrial Raspberry Pi devices like the PL-R5 support USB OTG. The PL-R5 used in this study also supports it.
USB OTG (On-The-Go) is the ability for a single USB port to become both a Host and a Device.
OTG-enabled ports are characterized by the ability to switch roles depending on the situation.
- USB Ethernet Adapter
- USB serial communication devices
- USB Storage
- Composite using multiple functions
The use of USB OTG on an industrial Raspberry Pi can be used in the following ways as an example.
- PC connection to run the initial setup.
- Access via serial connection for maintenance
- Let it run for logging
- Provide a web management UI
Linux has a mechanism called USB Gadget Framework. Therefore, it is supported in its standard state.
| gadget | Contents |
|---|---|
| g_ether | USB Ethernet |
| g_serial | USB Serial |
| g_mass_storage | USB Storage |
| g_hid | Keyboard and mouse |
| Composite | Simultaneous provision of multiple functions |
ConfigFS-based USB Gadget configuration is currently the standard in Linux. (Configured under /sys/kernel/config/usb_gadget/)
Although single modules such as g_ether can be started automatically by the kernel and are easy to use, multiple functions of g_~ series cannot be configured at the same time.
Therefore, it is necessary to configure them in the Composite configuration, which has many configuration points from a practical standpoint.
Starting with enabling USB OTG, this article will set up three functions at once in the final Composite.
Notes at the time of writing
For this environment, we used the PL-R5, an industrial Raspberry Pi based on the CM5. the OS is Raspberry Pi OS (bookworm). The host PC was tested on Linux/macOS.
Verification environment
Model: Industrial Raspi “PL-R5” (Raspberry Pi Compute Module 5 Rev 1.0)
OS: Debian GNU/Linux 12 (bookworm)
Kernel: 6.12.62+rpt-rpi-v8
macOS: Tahoe 26.3
When Windows is used as the host PC, RNDIS (Remote Network Driver Interface Specification) is required with the driver because ECM (Ethernet Control Model) is not supported.
Also, although not mentioned here, the Raspberry Pi OS Trixie includes the rpi-usb-gadget package. If you enable it, it will be recognized as a USB Ethernet device without any manual configuration, and you can immediately connect via SSH without having to configure Wi-Fi or wired LAN.
The following is a quote from the official website.
“Starting with Raspberry Pi OS Trixie images dated 20.10.2025 or later, a new package called rpi-usb-gadget is included by default. activated, the Raspberry Pi presents itself as a USB Ethernet device, and you can connect via SSH immediately, without configuring Wi-Fi or Ethernet .”
https://www.raspberrypi.com/news/usb-gadget-mode-in-raspberry-pi-os-ssh-over-usb/
There are many different ways to do and set up USB OTG in one bite. I found it a bit complicated.
So if it is just USB Ethernet, there is now an additional mechanism to make it easier.
Preparation: Set USB OTG port to Device mode (manually)
Here we will set up all USB OTG manually.
To use the PL-R5’s USB2.0 OTG port on the device side, you must first enable the USB controller in Peripheral mode at boot time.
Note that you will eventually configure the three functions in Configfs as Composite, in which case you will need to edit cmdline.txt again.
/boot/firmware/config.txtAdd to
dtoverlay=dwc2,dr_mode=peripheralHowever, since CM5 series often have dir_mode=host as the standard (default) description, please comment out the original before adding it.
[cm5]
#dtoverlay=dwc2,dr_mode=host
dtoverlay=dwc2,dr_mode=peripheral
There is another addition to /boot/firmware/cmdline.txt.
Enter the following at the end, separated by a single space:
The rule is that cmdline.txt should be written on a single line. No line breaks.
modules-load=dwc2Reboot and the USB OTG device mode will be enabled.
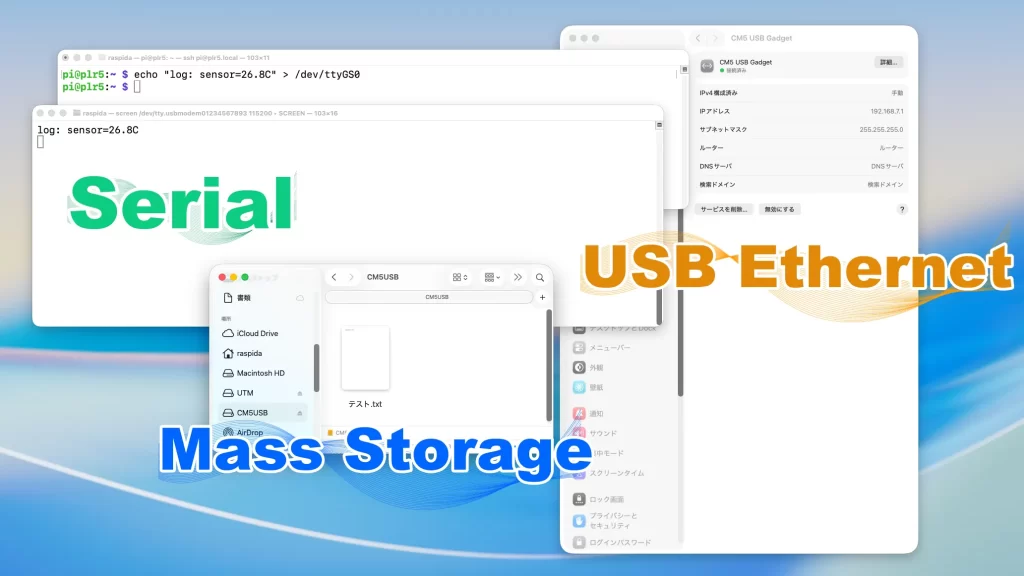
USB Composite (configured in Configfs)
When using USB OTG, it is preferable to use combined Ethernet and serial communication rather than a stand-alone configuration.
To have multiple functions provided at the same time, it is not possible to configure the settings in the g_~ system, so configure the settings in configfs. This is called USB Composite.
– Single function (Ethernet/Serial/Mass Storage) → multiple cannot be specified, auto start by Kernel (no systemd required)
– Combined function (Mass Storage + Ethernet, etc.) → configfs + Create systemd
Note that using g_ether and other configfs settings at the same time will cause conflicts, so be sure to use one of them.
This time, we will make it Composite so that Ethernet + Serial + Mass Storage can be provided with a single USB cable.
Only each function can be configured in Configfs.
One note of caution: if you want to make additional edits later, you must deactivate UDC once enabled in the settings and then re-enable UDC, or it may break.
I did it once in a test. It can happen if you make a mistake in the procedure.
In this case, we have prepared a script file that sets up all three functions in a single step.
USB Composite Settings
First add the following to the /boot/firmware/cmdline.txtthat you just edited. Reboot to activate.
modules-load=dwc2,libcompositeAfter loading libcomposite, we will create the necessary configuration files at /sys/kernel/config/usb_gadget/.
In this case, we have created a directory named CM5. The name can be anything you like, but please change it accordingly since it is specified elsewhere.
If you create a directory under the directory, you will see that the following files have been created.
UDC           bDeviceProtocol  bMaxPacketSize0  bcdUSB   functions  idVendor   os_desc  webusb
bDeviceClass  bDeviceSubClass  bcdDevice        configs  idProduct  max_speed  strings
We will make changes to the files here.
usb_gadget configuration example
We will set up the USB gadget to be connected. The following is the contents of the settings we specified this time.
We will explain how we specified them one by one in the script, which will be run as a script later.
sudo modprobe libcomposite

cd /sys/kernel/config/usb_gadget/
sudo mkdir cm5
cd cm5

echo 0x1d6b | sudo tee idVendor      # Linux Foundation
echo 0x0104 | sudo tee idProduct     # Multifunction Composite
echo 0x0100 | sudo tee bcdDevice     # Device release number v1.0.0
echo 0x0200 | sudo tee bcdUSB        # USB2.0

sudo mkdir strings/0x409   # en-US English
echo "0001" | sudo tee strings/0x409/serialnumber
echo "RaspberryPi" | sudo tee strings/0x409/manufacturer
echo "CM5 Composite" | sudo tee strings/0x409/product
Begin by loading sudo modprobe libcomposite. This should only be done once before creating & running the script, just to be safe.
Vendor IDs and product IDs along the way are originally determined by each manufacturer, but since this was a test, we used the “Linux Foundation” ID for the vendor and the “Multifunction Composite” ID for the product ID.
bcdDevice is the release number, so v1.0.0, and bcdUSB is the USB 2.0 value.
In addition, strings/0x409specifies English (en-US) characters, and serialnumber, manufacturer, and product are optional, but should be easy to understand.
product, for example, is also the part displayed on the host PC side, so it is better to name it in a way that is easy to understand.
Based on these considerations, we specified them in the script file.
Script file for Composite configuration
We present a script to set up a composite USB gadget (ECM + ACM + Mass Storage) for CM5 at once.
Prerequisites: config.txt and cmdline.txt with dwc2 and libcomposite already loaded.
The contents are roughly as follows
- UDC Release
- gadget generation
- ecm/acm/mass_storage creation
- Link to config
- UDC re-bind
- USB Ethernet Settings
cm5-usb-gadget.sh
sudo nano /usr/local/sbin/cm5-usb-gadget.sh
#!/bin/bash
set -euo pipefail

G=/sys/kernel/config/usb_gadget/cm5
UDC_DEV=$(ls /sys/class/udc | head -n 1)
[ -z "$UDC_DEV" ] && exit 1

# Remove existing configuration (to allow re-execution)
if [ -d "$G" ]; then
    echo "" > "$G/UDC" || true
    rm -rf "$G"
fi

mkdir -p "$G"
cd "$G"

# ===== Device Descriptor =====
echo 0x1d6b > idVendor      # Linux Foundation
echo 0x0104 > idProduct     # Multifunction Composite Gadget
echo 0x0200 > bcdUSB
echo 0x0100 > bcdDevice

mkdir -p strings/0x409
echo "0123456789" > strings/0x409/serialnumber
echo "Raspberry Pi" > strings/0x409/manufacturer
echo "CM5 USB Gadget" > strings/0x409/product

# ===== Config =====
mkdir -p configs/c.1
mkdir -p configs/c.1/strings/0x409
echo "ECM + ACM + MassStorage" > configs/c.1/strings/0x409/configuration
echo 250 > configs/c.1/MaxPower

# ===== ECM (USB Ethernet) =====
mkdir -p functions/ecm.usb0
echo "02:00:00:00:00:01" > functions/ecm.usb0/dev_addr
echo "02:00:00:00:00:02" > functions/ecm.usb0/host_addr
ln -s functions/ecm.usb0 configs/c.1/

# ===== ACM (USB Serial) =====
mkdir -p functions/acm.usb0
ln -s functions/acm.usb0 configs/c.1/

# ===== Mass Storage =====
IMG="/opt/usb/piusb.bin"
LABEL="CM5USB"
mkdir -p /opt/usb

if [ ! -f "$IMG" ]; then
    dd if=/dev/zero of="$IMG" bs=1M count=128
    mkfs.vfat -n "$LABEL" "$IMG"
fi

fatlabel "$IMG" "$LABEL" || true

mkdir -p functions/mass_storage.usb0
echo 1 > functions/mass_storage.usb0/stall
echo 0 > functions/mass_storage.usb0/lun.0/removable
echo 0 > functions/mass_storage.usb0/lun.0/ro
echo "$IMG" > functions/mass_storage.usb0/lun.0/file
ln -s functions/mass_storage.usb0 configs/c.1/

# ===== Bind =====
echo "$UDC_DEV" > UDC

# ====== USB Ethernet static IP configuration ======
sleep 1

if ip link show usb0 >/dev/null 2>&1; then
    ip addr flush dev usb0 || true
    ip addr add 192.168.7.2/24 dev usb0 || true
    ip link set usb0 up || true
fi
Although there are different parts in each environment, it is expected that there will be no problem as it is.
In this case, we have “Unexisting (anti-re-execution)” at the beginning.
This is because the program is to be executed at every startup. This is so that even if some setting values are changed and the system is restarted, the changes will be reflected in the new settings.
In the Mass Storage section, we specify the location and name of the image file and its label because it is easier to understand if the label is displayed when connecting.
If you want to change it arbitrarily, change here.
IMG="/opt/usb/piusb.bin"
LABEL="CM5USB"
UDC is enabled by writing echo $UDC_DEV > UDCand the UDC value in the Bind section.
Finally, the IP address is fixed.
It is possible to not set it, but it is difficult to understand in many ways, so we have decided to use a fixed IP address. (It will be 169.254.x.x/16)
Since we want USB Ethernet to operate as an independent network, we need to choose a third octet that is different from the home LAN.
So 192.168.7.0/24 is safe because it is unlikely to overlap with a typical home LAN.
192.168.7.1  # Host PC
192.168.7.2  # Pi
Incidentally, we have usb0 enabled (up) along with the fixed IP settings, so we are killing two birds with one stone.
After creating the script, grant execution permission.
sudo chmod +x /usr/local/sbin/cm5-usb-gadget.shsystemd-ize (auto-start support)
Create a service so that the configuration will automatically take effect.
sudo nano /etc/systemd/system/cm5-usb-gadget.service
[Unit]
Description=CM5 USB Composite Gadget
After=network.target

[Service]
Type=oneshot
ExecStart=/usr/local/sbin/cm5-usb-gadget.sh
RemainAfterExit=yes

[Install]
WantedBy=multi-user.target
The contents of this configuration will run cm5-usb-gadget.sh only once at startup as an oneshot service.
In other words, it will rebuild the configfs each time.
As mentioned earlier, if you want to change some of the USB OTG contents to enable it, you just need to reboot again.
This is possible because the UDC is removed at the beginning of the sh file.
RemainAfterExit=yesmakes the service active (exited), which is useful for configuration services that wish to maintain state. It is not resident.
Finally, do not forget to activate (enable) the service you have created. Do not start the service here, because the sh file will be executed.
sudo systemctl enable cm5-usb-gadget.serviceNow reboot and USB OTG with all three features enabled will work.
Individual ways to help you know
I leave this as a reminder that there are some situations where it would be helpful to know.
UDC deactivation/enablement
The UDC, which is mentioned several times, is initially an empty file with nothing in it.
The Configfs method becomes effective after writing the value of its own UDC device name (e.g. 1000480000.usb) to the UDC.
Therefore, we want to write every time we change or add something to the configuration, but if it is already enabled as a UDC, we need to deactivate it (delete the value) and then re-enable it.
Since we had a little trouble with this rewrite, we leave the command to be done manually.
Use the UDC name (e.g. 1000480000.usb) displayed in the following command.
ls /sys/class/udcCommand to write a value.
echo "1000480000.usb" | sudo tee /sys/kernel/config/usb_gadget/cm5/UDC > /dev/nullUnlocking a UDC empties a UDC that already has a value.
When making changes, such as adding a new Function to the UDC, it is necessary to empty the UDC in the same way, then configure it and re-enable it.
Empty value command.
echo "" | sudo tee /sys/kernel/config/usb_gadget/cm5/UDC > /dev/nullAfter deactivating and changing each function, re-enable it in the same way as before.
Note that each function must execute the command with reference to the script.
echo "1000480000.usb" | sudo tee /sys/kernel/config/usb_gadget/cm5/UDC > /dev/nullInvestigating Errors
I won’t go into detail, but I will leave you with a command to try if it doesn’t work.
journalctl -u cm5-usb-gadget.serviceCommands to try in the communication investigation. All are executed on the Pi side.
ip route
ip route | grep usb0
ip addr show usb0
cat /sys/class/net/usb0/carrier
ip link show
systemctl status cm5-usb-gadget.service
nmcli dev status
Single and combined functions
For single-function use, g_ether and g_serial, which are not covered here, are the most convenient.
However, if you have detailed settings or use multiple functions to begin with, use the Configfs method.
It is a bit cumbersome to set up manually because there are many settings.
Script files are convenient because they can be created once and require fewer steps, and they are easy to manage because of their listability.
If you want to try a quick USB OTG, copy and paste the script file and try it.

Article contributed by Raspida
Raspberry Pi information site that even non-engineers can enjoy using raspida.com a Raspberry Pi information site that even non-engineers can enjoy and handle. He also contributes technical blog articles to the PiLink site on the Raspberry Pi for industrial use.