
A typical Raspberry Pi uses a microSD card to write the operating system, which is a convenient but easily damaged storage medium. eMMC is used in industrial applications such as CM5 because it is more robust than a microSD card. One of the reasons eMMC is used in industrial applications such as CM5 is because it is a more robust storage medium than microSD cards.
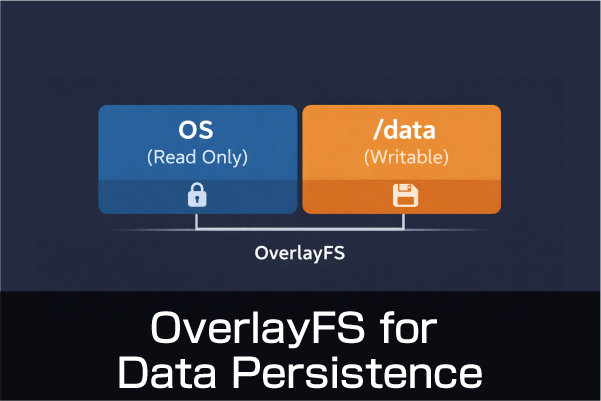
By making the OS part of a microSD card or other storage media read-only, the amount of writing to the storage media can be greatly reduced, thereby extending the life of the storage media. In addition, it increases the probability of preventing damage to the OS section in the event of a sudden power failure.
Raspberry Pi has a method called “Overlay File System” that can be easily configured from raspi-config. It has been available for configuration from raspi-configfor quite some time now.
OverlayFS is a mechanism that treats the system (OS) as read-only (RO) and makes the entire system look like a single file system by copying and storing only files where writing occurs to another writable area (upper layer).
This writable area is expanded in memory as tmpfs and will disappear when the power is turned back on.
At first glance, the system can be treated as if it has been modified & saved, but the system part is read-only and has not been modified.
So, if you turn off the power, nothing is lost.
This means that the system reverts back to the point at which it was made read-only.
We would like to retain and use at least a minimum number of files after the reboot.
While using Overlayfs, this is achieved by evacuating data with a symbolic link to a separate partition.
In this case, we focused only on network-related changes and saving the home folder.
Test environment for this test
The environment we tested this time is as follows.
- 32 GB microSD card (64 GB or more recommended)
- Ubuntu Desktop 25.10 (64-bit)
- Split /data into a separate partition
- Save to /data using a symbolic link (symlink)
- Network uses NetworkManager
- OverlayFS is configured manually by editing cmdline.txt
- Tests were performed on an actual Pi 5 machine (this method is equally applicable to PL-R5 with CM5)
We are trying to split the microSD card with 10 GB of /data space.

The method of partitioning a partition is the same as the method of partitioning a partition in which the How to split the partition where the OS is installed for details.
After booting Ubuntu, which has been partitioned for evacuation, complete the update.
In this state, we will proceed with the next steps.
Configuration Flow
The general flow of the setup is as follows
1. Write Ubuntu
2. Boot on the actual machine and complete the initial setup and updates.
3. Read the microSD card once on another machine and partition it (about 10GB for saving data)
4. Preparation work before Overlayfs
5. Enable Overlayfs
Now that we have finished up to 3, we continue with preparations for the final Overlayfs.
Finally, with Overlayfs enabled, check the network settings for changes, etc.
Mount another partition
We will work on the split partition after it is mounted.
lsblk checks that the split partition is not mounted yet. ( mmcblk0p3)
NAME        MAJ:MIN RM  SIZE RO TYPE MOUNTPOINTS
mmcblk0     179:0    0  29.7G  0 disk
├─mmcblk0p1 179:1    0   512M  0 part /boot/firmware
├─mmcblk0p2 179:2    0  19.9G  0 part /
└─mmcblk0p3 179:3    0   9.3G  0 part
Create /data under root and mount mmcblk0p3 there.
sudo mkdir -p /data
sudo mount /dev/mmcblk0p3 /data
└─mmcblk0p3 179:3 0 9.3G 0 part /dataIt is OK if the
To have it automatically mounted at startup, append to fstab. blkid or the next coman to find out the UUID.
sudo blkid -s UUID -o value /dev/mmcblk0p3or
lsblk -f /dev/mmcblk0Copy the UUID and then append it to fstab at sudo nano /etc/fstab. (UUID should be read as.)
UUID=f3afb6b2-a959-4c4b-bdb6-3c38a0fe33be /data ext4 defaults 0 2Update and remount and check the MOUNT status.
sudo systemctl daemon-reload
sudo mount -a
mount | grep /data
/dev/mmcblk0p3 on /data type ext4 (rw,relatime,errors=remount-ro)is displayed, it is OK.
Role of the /data Partition
Eventually, /data will be made writable (rw), so the network settings will be moved to this /data area.
The /home directory is also saved in the /data area.
The rootfs of the system should be Overlayfs, which is read-only (ro) at the end.
At this time, there are two general methods of saving data.
There are two methods: the symbolic link (symlink) method and the bind mount method.
This time it is a symbolic link.
Overlayfs + symbolic links
The workflow for symbolic links is as follows
1. Create a directory as a limbic link destination and make it a mount point.
2. Copy the original files.
3. Create a symbolic link.
4. Confirm the symbolic link.
After the symbolic links are properly set up, we will convert them to Overlayfs.
1. create directories for mount points
Prepare only an empty directory before executing the symbolic link. Mount point.
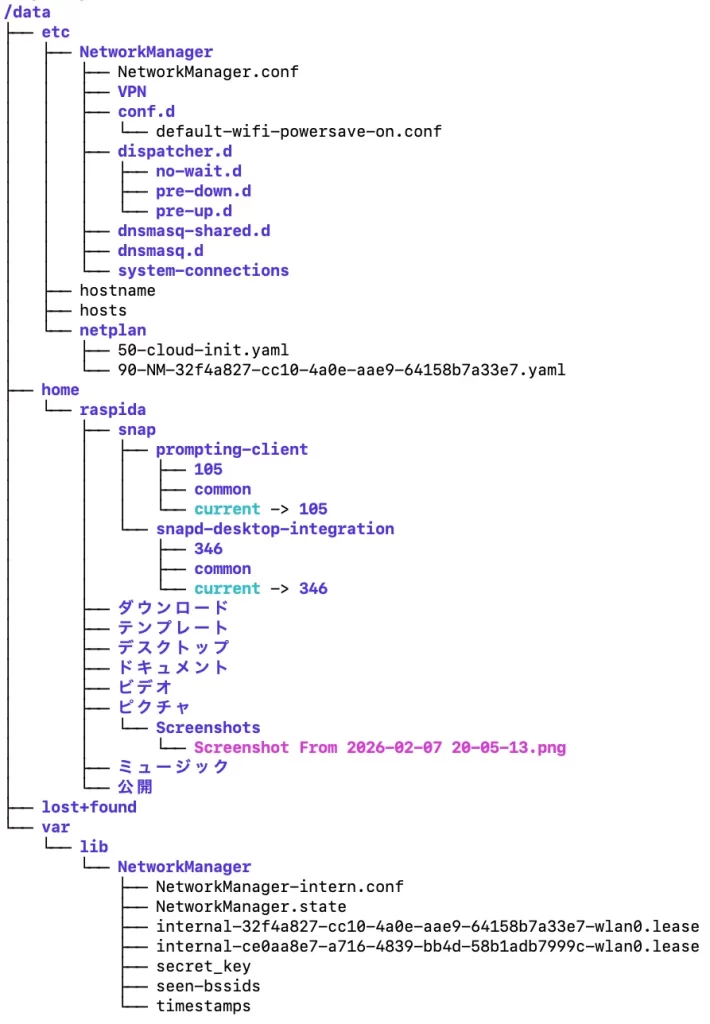
In this case, the following five are to be symbolically linked.
- /etc/NetworkManager
- /var/lib/NetworkManager
- /home
- /etc/hostname
- /etc/hosts
- Create a directory for mounting in /etc/netplan /data.
sudo mkdir -p /data/etc/NetworkManager
sudo mkdir -p /data/var/lib/NetworkManager
sudo mkdir -p /data/home
sudo mkdir -p /data/etc/netplan
2. copying files
Copy the original data to the /data side.
The directory designation in the command should include a trailing slash because, in this case, we want to copy only the contents into a directory that already exists.
If you make a mistake in this area, you will get stuck with nested directories.
-Trailing slash for “include contents”
-None for “create an entire folder”
# Copy NetworkManager configuration
sudo rsync -a /etc/NetworkManager/ /data/etc/NetworkManager/
sudo rsync -a /var/lib/NetworkManager/ /data/var/lib/NetworkManager/

# Copy netplan configuration
sudo rsync -a /etc/netplan/ /data/etc/netplan/

# Copy the home directory
sudo rsync -a /home/ /data/home/

# Copy configuration files
sudo cp -a /etc/hosts /data/etc/hosts
sudo cp -a /etc/hostname /data/etc/hostname
hosts and hostname are one file. So the cp -acommand is fine.
*netplan/ has Wi-Fi connection information.
3. creating symbolic links
Delete the original group of files before creating a symbolic link.
sudo rm -rf /etc/NetworkManager
sudo ln -s /data/etc/NetworkManager /etc/NetworkManager

sudo rm -rf /var/lib/NetworkManager
sudo ln -s /data/var/lib/NetworkManager /var/lib/NetworkManager

sudo rm -rf /etc/netplan
sudo ln -s /data/etc/netplan /etc/netplan

# Move to the root directory before modifying /home
cd /
sudo rm -rf /home
sudo ln -s /data/home /home

sudo ln -sf /data/etc/hosts /etc/hosts
sudo ln -sf /data/etc/hostname /etc/hostname
We will check it once here.
ls -l /etc/NetworkManager
ls -l /var/lib/NetworkManager
ls -l /etc/netplan
ls -l /home
ls -l /etc/hostname
ls -l /etc/hosts
For example, the display should look something like this
lrwxrwxrwx 1 root root 24 Feb  7 21:08 /etc/NetworkManager -> /data/etc/NetworkManager
lrwxrwxrwx 1 root root 28 Feb  7 21:09 /var/lib/NetworkManager -> /data/var/lib/NetworkManager
lrwxrwxrwx 1 root root 17 Feb  9 09:40 /etc/netplan -> /data/etc/netplan
lrwxrwxrwx 1 root root 10 Feb  7 21:09 /home -> /data/home
lrwxrwxrwx 1 root root 18 Feb  7 21:10 /etc/hostname -> /data/etc/hostname
lrwxrwxrwx 1 root root 15 Feb  7 21:10 /etc/hosts -> /data/etc/hosts
Check to see if NetworkManager and others are using the /data side with symbolic links.
realpath /etc/NetworkManager
realpath /etc/NetworkManager
realpath /var/lib/NetworkManager
As a result, it is OK if the realpath command also shows the path on the /data side.
/data/etc/NetworkManager
/data/var/lib/NetworkManager
The mounted /data partition will eventually look like this.
The copy is ready on the /data side, which is writable.
4. install and update Overlayfs
At this point, we are ready to go.
Install overlayroot and update initramfs.
1. install Overlayfs (overlayroot)
2. add to cmdline.txt
3. change network settings with Overlayfs and check if it is permanent
sudo apt update
sudo apt install overlayroot
sudo update-initramfs -u
sudo reboot
The initramfs will display something like this when the update is complete.
update-initramfs: Generating /boot/initrd.img-6.17.0-1007-raspi
Using DTB: bcm2712-rpi-5-b.dtb
Installing /lib/firmware/6.17.0-1007-raspi/device-tree/broadcom/bcm2712-rpi-5-b.dtb into /boot/dtbs/6.17.0-1007-raspi/./bcm2712-rpi-5-b.dtb
Taking backup of bcm2712-rpi-5-b.dtb.
Installing new bcm2712-rpi-5-b.dtb.
flash-kernel: installing version 6.17.0-1007-raspi
Copying kernel assets to /boot/firmware/new/
Copying boot firmware to /boot/firmware/new/
Copying device trees to /boot/firmware/new/
Copying device tree overlays to /boot/firmware/new/overlays/
Please be aware next reboot will boot twice
5. Add to cmdline.txt
When we return from the reboot, we want to keep only /data as rw, so we add it with an option to exclude another block.
The path to cmdline.txt differs from the Raspberry Pi OS.
sudo nano /boot/firmware/current/cmdline.txtAppend to the beginning of cmdline.txt.
Note: cmdline.txt must be written on a single line. No line breaks. Space between items.
overlayroot=tmpfs:recurse=0overlayroot=tmpfs:recurse=0 zswap.enabled=1 zswap.compressor=zstd multipath=off dwc_otg.lpm_enable=0 console=tty1 root=LABEL=writable rootfstype=ext4 panic=10 rootwait fixrtc quiet splashAfter writing, reboot.
This completes the entire setup.
Reboot to see if only bootfs is now read-only (ro).
Check read-only and writable.
After rebooting, make sure that Overlayfs is properly enabled on the rootfs side.
Conversely, /data is also checked for writability.
First of all, the result of lsblk is that rootfs is now properly overlayfs. (/media/root-ro)
/data is rw as it is.
mmcblk0     179:0    0  29.7G  0 disk
├─mmcblk0p1 179:1    0   512M  0 part /boot/firmware
├─mmcblk0p2 179:2    0  19.9G  0 part /media/root-ro
└─mmcblk0p3 179:3    0   9.3G  0 part /data
When you connect to SSH in a terminal, you can often see it because it is displayed when you connect. overlay is indicated.
tmpfs-root /media/root-rw tmpfs rw,relatime,inode64 0 0
overlayroot / overlay rw,relatime,lowerdir=/media/root-ro,upperdir=/media/root-rw/overlay,workdir=/media/root-rw/overlay-workdir/_,uuid=on,nouserxattr 0 0
/dev/mmcblk0p2 /media/root-ro ext4 ro,relatime 0 0
We will check with them individually.
mount | grep " on / "
mount | grep /data
ls -l /etc | grep NetworkManager
ls -l / | grep /home
Expected Results:
mount | grep " on / "
overlayroot on / type overlay (rw,relatime,lowerdir=/media/root-ro,upperdir=/media/root-rw/overlay,workdir=/media/root-rw/overlay-workdir/_,uuid=on,nouserxattr)

mount | grep /data
/dev/mmcblk0p3 on /data type ext4 (rw,relatime)

ls -l /etc | grep NetworkManager
lrwxrwxrwx 1 root                 root                    24 Feb  7 21:08 NetworkManager -> /data/etc/NetworkManager

ls -l / | grep /home
lrwxrwxrwx   1 root    root            10 Feb  7 21:09 home -> /data/home
Did you see the expected results? Overlayfs is now complete.
I’ll do a final test.
I’ll test a couple of things.
Change Wi-Fi destination
We will change the Wi-Fi destination even in the Overlayfs state and verify if this is still reflected after the reboot.
Wi-Fi connection information exists in /etc/netplan in yaml format.
Since this is also a symbolic link, the /data side is rewritten and the original /etc should also refer to it.
There is one yaml named 90-NM-~ before the change.
sudo ls -l /data/etc/netplan/

-rw------- 1 root root 157 Oct  7 11:52 50-cloud-init.yaml
-rw------- 1 root root 706 Oct  7 11:55 90-NM-32f4a827-cc10-4a0e-aae9-64158b7a33e7.yaml
I changed from 5g Wi-Fi to 2g Wi-Fi using the GUI controls on the desktop.
As a result, I have one more. Of course, it is connected to Wi-Fi.
-rw------- 1 root root 157 Oct  7 11:52 50-cloud-init.yaml
-rw------- 1 root root 706 Feb  9 09:54 90-NM-201e82b9-74eb-4783-a9db-48e3a5d7f14e.yaml
-rw------- 1 root root 706 Oct  7 11:55 90-NM-32f4a827-cc10-4a0e-aae9-64158b7a33e7.yaml
If the two are maintained in the same way after rebooting in this state, it is OK. They were indeed maintained.
Now we can change the Wi-Fi connection information even in Overlayfs state.
If the file is gone after rebooting, OK.
Finally, verify the writing of the file with Overlayfs in place.
Let’s create a test-file directly under root.
sudo touch /test_fileSince rootfs is an overlayfs, it behaves as if it has been modified in memory. At this point, you can write to it.
But this is just written in tmpfs, so it will be gone after reboot.
If the file itself disappears and is gone after reboot, then Overlayfs is working.
Reboot and check with ls -l /test_fileetc.
It should be gone.
To undo overlayfs
Thus, in the Overlayfs state, rebooting will return the system to the point at which it was made Overlayfs.
This is because the original rootfs area is read-only (ro) and behaves as (tmpfs) expanded in memory on its upper layer.
The tmpfs will disappear after a reboot.
To return rootfs read-only to normal read/write, delete overlayroot=tmpfs:recurse=0appended to cmdline.txt.
Then reboot and it will be back to normal.
If you want to convert to Overlayfs again, you can simply add the same information to cmdline.txt.
This can be done because bootfs remains writable.
Minimal data persistence
This time, in an Overlayfs environment, we fled some network-related and /home directories to a separate partition.
The changes were properly maintained, so the data was successfully persisted.
Symbolic links work fine for some files.
However, it does not make much sense to persist a whole group of files that are often accessed. This is especially true in this case because the partitions are just cut off in the same storage media.
It is no good if the rootfs is made read-only with Overlayfs, but the same media is accessed more and more.
The purpose of exporting configuration data or saving files generated even in Overlayfs state would be desirable.
I would like to pinpoint the setting as much as possible.
Supplement 1
Actually, with Raspberry Pi OS I couldn’t get this means, I thought it was a problem with Trixie, but apparently it was possible until bullseye, and the same procedure can’t be done from bookworm.
As far as I have been able to find out and verify, neither symlinks nor bindmounts have produced the expected results; it appears that they are being forced deep within the Raspberry Pi OS.
In particular, the bind mount has been changed to a block-by-block mount and has been downgraded to a simple mount.
I am not a Raspberry Pi OS developer in this area, so I do not know why. It may be a way to prevent beginners from accidentally destroying the system.
Ubuntu was fine as far as I tested.
Supplement 2
Changing the hostname in the overlayfs state was possible as far as I tried with the hostnamectl command, but the SSH connection remains an issue and the connection can only be made with the hostname before the change. After connecting, the hostname is also changed, only SSH seems to be picking up the pretty hostname. It seems that it would be better to change the hostname after disabling overlayfs.
Note that the SSH server is not initially installed on Ubuntu. It must be installed and activated with the following command.
sudo apt install openssh-server
sudo systemctl enable ssh
sudo systemctl start ssh
Article contributed by Raspida
Raspberry Pi information site that even non-engineers can enjoy using raspida.com a Raspberry Pi information site that even non-engineers can enjoy and handle. He also contributes technical blog articles to the PiLink site on the Raspberry Pi for industrial use.